软件安装
实验环境为Ubuntu14.04
安装MySql的客户端:sudo apt-get install mysql-server mysql-client
安装开发包:sudo apt-get install libmysqld++-dev
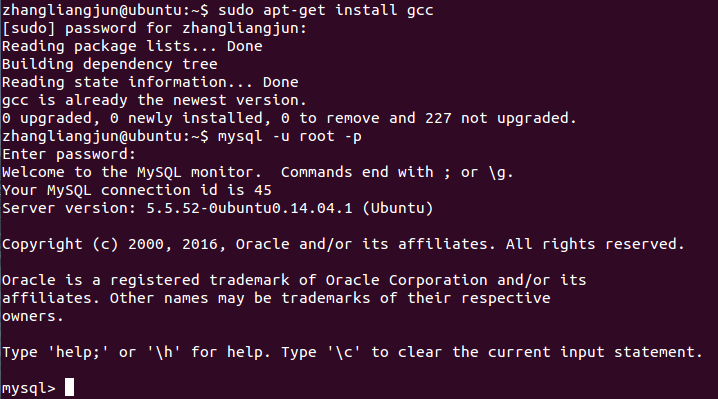
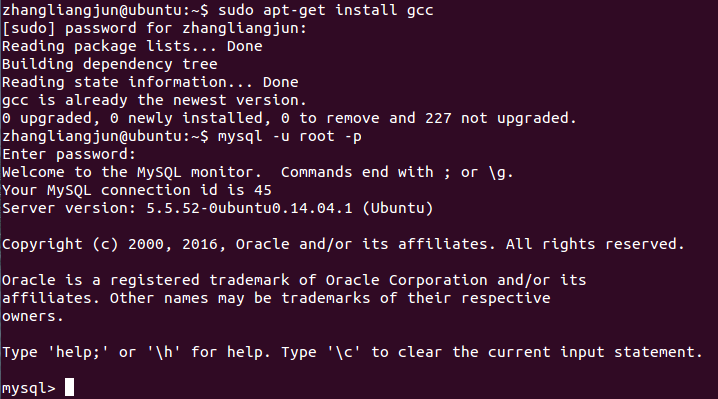
在安装的最后,Mysql会要求输入登录密码,直接输入就好,接下来测试安装是否成功,在终端输入:mysql -u-root -p
成功截图:

安装编译环境:sudo apt-get install gcc
成功截图:

创建数据库和表
在终端进入MySQL,指令:mysql -u root -p
若安装成功,则可以看到如下界面显示:

接着我们就可以在命令行创建数据库和表。
C代码实现与mysql连接
这里给出具体代码,代码实现很简单,主要部分有注释:
#include<stdio.h>
#include<stdlib.h>
#include<string.h>
#include<mysql/mysql.h>
MYSQL mysql;
MYSQL_RES *result;
MYSQL_ROW row;
int create_course_table();
int insert_rows_into_course_table();
void pause();
main(int argc,char **argv)
{
int num=0;
char fu[2];
mysql_init(&mysql);
//根据自己数据的用户名和密码进行连接
if(mysql_real_connect(&mysql,"localhost","root","199681","xxjl",3306,NULL,0))
{
//打印主界面的菜单
for(;;){
printf("Sample Embedded SQL for C application\n");
printf("Please select one function to execute:\n\n");
printf("0--exit.\n");
printf("1--创建学生表 6--添加成绩记录 b--删除课程记录 h--学生课程成绩表\n");
printf("2--创建课程表 7--修改学生记录 c--删除成绩记录 j--学生成绩统计表\n");
printf("3--创建成绩表 8--修改课程记录 e--显示学生记录 k--课程成绩统计表\n");
printf("4--添加学生记录 9--修改成绩记录 f--显示课程记录 m--数据库表名\n");
printf("5--添加课程记录 a--删除学生记录 g--显示成绩记录\n");
printf("\n");
fu[0]='0';
//输入菜单编号,选择相应的函数执行
scanf("%s",fu);
if (fu[0]=='0') exit(0);
if (fu[0]=='2') create_course_table();
if (fu[0]=='5') insert_rows_into_course_table();
pause();
}
}
//若不是正确用户名和密码,则显示数据库不存在
else
{
printf("Database not exist!\n");
}
mysql_close(&mysql);
return 0;
}
//表的初始创建
int create_course_table()
{
char yn[2];
char tname[21] = "xxxxxxxxxxx";
if (mysql_list_tables(&mysql, "course"))//删除表course
{
printf("The course table already exists,Do you want to delete it?\n");
printf("Delete the table?(y--yes,n--no):");
scanf("%s", yn);
if (yn[0] == 'y' || yn[0] == 'Y'){
if (!mysql_query(&mysql, "drop table course;"))
{
printf("Drop table course successfully!\n\n");
}
else
{
printf("ERROR: drop table course \n\n");
}
}
}
//创建表course
//插入数据
if (mysql_query(&mysql, "create table course (cno char(1) NOT null primary key,cname varchar(20) null ,cpno char(1) null ,ccredit int null) engine=innodb;") == 0)
{
printf("create table course successfully!\n\n");
}
else
{
printf("ERROR: create table course \n\n");
}
if (mysql_query(&mysql, "insert into course values('1', 'C langeage', '',3),('2', 'Database System', '1',4),('3', 'Digital Processing', '2',5),('4','Data structrue', '3',2),('5', 'operating system','4',3) ;") == 0)
{
printf("Success to insert rows to course table!\n\n");
}
else
{
printf("ERROR: insert rows \n\n");
}
return(0);
}
//表记录的插入
int insert_rows_into_course_table()
{
char icno[2];
char icname[20];
char icpno[2];
char iccredit[2];
char strquery[100] = "insert into course(cno,cname,cpno,ccredit) values('";
char yn[2];
while (1){
//依次输入表中各项的数据
printf("Please input cno(eg:1):");
scanf("%s", icno);
strcat(strquery, icno);
strcat(strquery, "','");
printf("Please input cname(eg:XXXX):");
scanf("%s", icname);
strcat(strquery, icname);
strcat(strquery, "','");
printf("Please input cpno(eg:1):");
scanf("%s", icpno);
strcat(strquery, icpno);
strcat(strquery, "','");
printf("Please input iccredit(eg:2):");
scanf("%s", iccredit);
strcat(strquery, iccredit);
strcat(strquery, "');");
if (mysql_query(&mysql, strquery) == 0)
{
printf("execute successfully!\n\n");
}
else
{
printf("ERROR: execute \n");
}
printf("Insert again?(y--yes,n--no):");
scanf("%s", yn);
if (yn[0] == 'y' || yn[0] == 'Y'){
continue;
}
else break;
}
if (mysql_errno(&mysql)) // 打印出错误
{
fprintf(stderr, "Error: %s\n", mysql_error(&mysql));
}
return (0);
}
void pause()
{
char junk[80], c;
printf("Press any key to continue!");
c = getchar();
gets(junk);
}
编译并测试代码
编译指令:gcc -I/usr/include/mysql text.c -L/usr/lib/mysql -lmysqlclient -o text
测试指令:./text
这里的mysql为可执行文件,在Ubuntu中后缀为.sh。该文件在编译时会生成。
测试结果
在运行mysql的文件后,可以看到在命令行出现如下界面:

至此,mysql就能够与C连接起来了,我们可以在命令行界面对数据库中的表进行修改;
修改之后我们可以在终端检查是否已经成功修改表。

