Redmine是开源的基于Web的项目管理系统,它使用Ruby on Rails框架开发。提供项目管理、WIKI、新闻台等功能,集成版本管理系统GIT、SVN、CVS等等。通过WEB 形式把成员、任务、文档、讨论以及各种形式的资源组织在一起,推动项目的进度。Redmine还提供了LDAP认证和REST接口,方便其它应用接入。
Redmine源代码:https://github.com/redmine/redmine
我选择使用Nginx做为Web Server,使用MySQL做为数据库。
Ubuntu 16.04安装Redmine
1、安装依赖软件
# 使用root用户:
$ sudo su root
cd
apt update
apt install mysql-server mysql-client libmysqlclient-dev imagemagick libmagickwand-dev libcurl4-openssl-dev git-core subversion build-essential
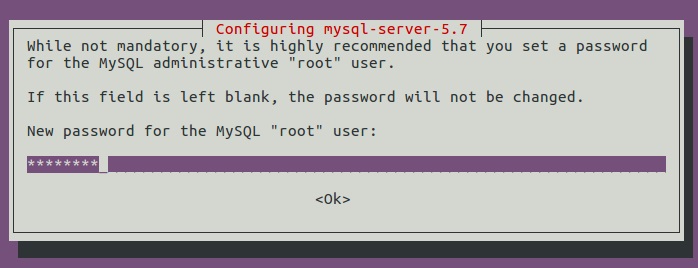
安装过程中需要设置MySQL root用户密码:

2、安装Ruby和SVM
参考:Ubuntu 16.04 安装 Ruby on Rails(http://www.linuxdiyf.com/linux/24683.html)
RVM是Ruby enVironment Manager的简写,是一个非常好ruby版本管理和安装工具。
导入RVM公共密钥:
curl -sSL https://rvm.io/mpapis.asc | sudo gpg2 --import -
下载RVM的安装脚本并执行:
curl -sSL https://get.rvm.io | bash -s stable
设置RVM环境变量:
source /usr/local/rvm/scripts/rvm
安装RVM依赖:
rvm requirements
安装Ruby;列出可用的Ruby版本:
rvm list known
安装Ruby最新版本:
rvm install 2.3.0
设置Ruby默认使用的版本:
rvm use 2.3.0 --default
查看Ruby版本:
ruby -v
3、为Redmine创建数据库
mysql -u root -p
mysql> CREATE DATABASE redmine;
mysql> CREATE USER redmine@localhost IDENTIFIED BY 'test1234';
mysql> GRANT ALL PRIVILEGES ON redmine.* TO redmine@localhost IDENTIFIED BY 'test1234';
mysql> FLUSH PRIVILEGES;
mysql> quit
上面SQL语句创建了一个叫redmine的数据库和redmine用户(密码test1234)。
4、安装Nginx和Phusion Passenger
Phusion Passenger是Apache和Nginx服务器的一个扩展模块,用于在服务器上更便捷地部署Ruby/Rails和Python/Django应用程序。
我使用Nginx集成Phusion Passenger。
安装Passenger:
gem install passenger --no-ri --no-rdoc
编译安装Nginx:
> passenger-install-nginx-module
Welcome to the Phusion Passenger Nginx module installer, v5.0.30.
This installer will guide you through the entire installation process. It
shouldn't take more than 5 minutes in total.
Here's what you can expect from the installation process:
1. This installer will compile and install Nginx with Passenger support.
2. You'll learn how to configure Passenger in Nginx.
3. You'll learn how to deploy a Ruby on Rails application.
Don't worry if anything goes wrong. This installer will advise you on how to
solve any problems.
Press Enter to continue, or Ctrl-C to abort. # 回车
--------------------------------------------
Which languages are you interested in?
Use <space> to select.
If the menu doesn't display correctly, press '!' # 选择Ruby和Python
⬢ Ruby
⬢ Python
⬡ Node.js
⬡ Meteor
--------------------------------------------
Checking for required software...
* Checking for C compiler...
Found: yes
....
--------------------------------------------
Automatically download and install Nginx?
Nginx doesn't support loadable modules such as some other web servers do,
so in order to install Nginx with Passenger support, it must be recompiled.
Do you want this installer to download, compile and install Nginx for you?
1.Yes: download, compile and install Nginx for me. (recommended)
The easiest way to get started. A stock Nginx 1.10.1 with Passenger
support, but with no other additional third party modules, will be
installed for you to a directory of your choice.
2.No: I want to customize my Nginx installation. (for advanced users)
Choose this if you want to compile Nginx with more third party modules
besides Passenger, or if you need to pass additional options to Nginx's
'configure' script. This installer will 1) ask you for the location of
the Nginx source code, 2) run the 'configure' script according to your
instructions, and 3) run 'make install'.
Whichever you choose, if you already have an existing Nginx configuration file,
then it will be preserved.
Enter your choice (1 or 2) or press Ctrl-C to abort: 1 # 编译安装Nginx
--------------------------------------------
....
Where do you want to install Nginx to?
Please specify a prefix directory [/opt/nginx]: /opt/nginx # 设置Nginx安装目录,默认的/opt/nginx就可以。
5、配置Nginx
vim /opt/nginx/conf/nginx.conf
在文件倒数第二行(}前)添加:
include vhost/*.conf;
创建vhost目录:
mkdir -p /opt/nginx/conf/vhost
创建Virtual Host配置文件:
vim /opt/nginx/conf/vhost/redmine.conf
写入如下内容:
server {
listen 80;
server_name www.your_domain.com;
root /var/www/redmine/public;
passenger_enabled on;
client_max_body_size 10m; # Max attachemnt size
# redirect server error pages to the static page /50x.html
#
error_page 500 502 503 504 /50x.html;
location = /50x.html {
root html;
}
}
注意替换域名。
测试Nginx配置:
/opt/nginx/sbin/nginx -t
# nginx: the configuration file /opt/nginx/conf/nginx.conf syntax is ok
# nginx: configuration file /opt/nginx/conf/nginx.conf test is successful
把Nginx配置为Systemd服务:
vim /lib/systemd/system/nginx.service
写入内容:
[Unit]
Description=The NGINX HTTP and reverse proxy server
After=syslog.target network.target remote-fs.target nss-lookup.target
[Service]
Type=forking
PIDFile=/opt/nginx/logs/nginx.pid
ExecStartPre=/opt/nginx/sbin/nginx -t
ExecStart=/opt/nginx/sbin/nginx
ExecReload=/bin/kill -s HUP $MAINPID
ExecStop=/bin/kill -s QUIT $MAINPID
PrivateTmp=true
[Install]
WantedBy=multi-user.target
启动Nginx服务:
systemctl daemon-reload
systemctl start nginx
6、安装Redmine
mkdir -p /var/www/
cd /var/www/
svn co https://svn.redmine.org/redmine/branches/3.2-stable redmine # 下载3.2版本源码
创建配置文件:
cd redmine
cp config/configuration.yml.example config/configuration.yml
cp config/database.yml.example config/database.yml
配置数据库连接信息:
vim config/database.yml
production:
adapter: mysql2
database: redmine
host: localhost
username: redmine
password: "test1234"
encoding: utf8
更改目录权限:
mkdir -p tmp tmp/pdf public/plugin_assets
chown -R www-data:www-data files log tmp public/plugin_assets
chmod -R 775 files log tmp public/plugin_assets
安装依赖:
gem install bundler
bundle install --without development test
生成tocken和数据表:
bundle exec rake generate_secret_token
RAILS_ENV=production bundle exec rake db:migrate
RAILS_ENV=production bundle exec rake redmine:load_default_data
最后,重启Nginx:
systemctl restart nginx
7、完成安装
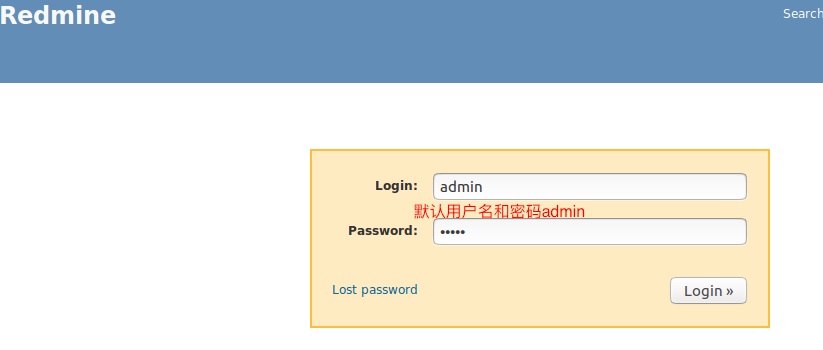
使用浏览器访问:www.your_domain.com

管理员页面:www.your_domain.com/login


Redmine文档:http://www.redmine.org/projects/redmine/wiki/Guide

