前言
简单记录一下Linux CentOS 7中安装与配置Tengine的详细步骤。
简介与安装
Tengine是淘宝发起的web服务器项目,简单的讲就是对nginx进行了二次开发并提供了更丰富的功能,官网地址:http://tengine.taobao.org/,目前最新的稳定版本是2.1.2,我这里也用的这个版本,下载地址:http://tengine.taobao.org/download/tengine-2.1.2.tar.gz。废话不多说下面开始安装,首先将安装文件上传至Linux服务器后,输入命令进行解压:
tar -zxvf tengine-2.1.2.tar.gz
解压完成后删除安装包:
rm -rf tengine-2.1.2.tar.gz
在安装之前首先检查一下是否已安装nginx的一些模块依赖的lib库,诸如g++、gcc、pcre-devel、openssl-devel和zlib-devel。所以下面这些命令最好挨个跑一遍,已安装的会提示不用安装,未安装或需要更新的则会执行安装及更新:
yum install gcc-c++
yum -y install pcre pcre-devel
yum -y install zlib zlib-devel
yum -y install openssl openssl-devel
安装完依赖后下面就可以放心开始安装nginx了,输入安装命令并指定安装路径:
./configure --prefix=/wocloud/nginx
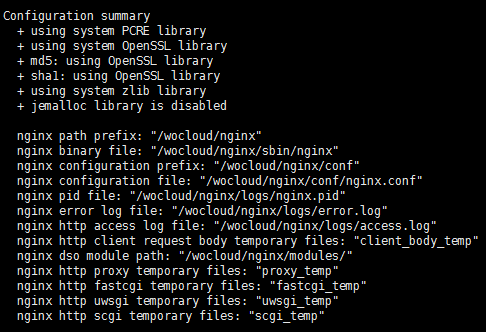
看到如下提示信息就说明没有问题:

最后通过make以及make install进行编译安装:
make
make install
安装完成后尝试启动一下,进入nginx目录输入启动命令:
sbin/nginx
启动完成后在内网的另一外服务器尝试访问:

出现上图显示的welcome字样即成功启动了tengine,接下来我们修改conf目录下的nginx.conf进行配置。
配置
关于配置不做过多详细说明了,关于这方面的资料很多,下面给出我们生产环境中的nginx配置以供参考:
user root;
worker_processes 8;
pid logs/nginx.pid;
worker_rlimit_nofile 655350;
events {
use epoll;
worker_connections 655350;
}
http {
include mime.types;
default_type application/octet-stream;
server_names_hash_bucket_size 128;
client_header_buffer_size 32k;
large_client_header_buffers 4 32k;
client_max_body_size 8m;
sendfile on;
tcp_nopush on;
keepalive_timeout 60;
tcp_nodelay on;
fastcgi_connect_timeout 300;
fastcgi_send_timeout 300;
fastcgi_read_timeout 300;
fastcgi_buffer_size 64k;
fastcgi_buffers 4 164k;
fastcgi_busy_buffers_size 428k;
fastcgi_temp_file_write_size 428k;
gzip on;
gzip_min_length 1k;
gzip_buffers 4 16k;
#gzip_http_version 1.0;
gzip_comp_level 2;
gzip_types text/plain application/x-javascript text/css application/xml text/javascript image/jpeg image/gif image/png;
gzip_vary off;
gzip_disable "MSIE [1-6]\.";
upstream localhost{
ip_hash;
server 172.xx.1x3.69:7071 weight=2;
server 172.xx.1x3.69:7072 weight=2;
server 172.xx.1x3.69:7073 weight=1;
server 172.xx.1x3.70:8081 weight=2;
server 172.xx.1x3.70:8082 weight=2;
server 172.xx.1x3.70:8083 weight=1;
}
server {
listen 80;
server_name localhost;
location / {
root html;
index index.html;
proxy_connect_timeout 3;
proxy_send_timeout 30;
proxy_read_timeout 30;
proxy_pass http://localhost;
}
error_page 404 /500_error.html;
error_page 500 502 503 504 /500_error.html;
location = /500_error.html {
root html;
}
location ~ .*/.(gif|jpg|jpeg|png|bmp|swf)$
{
expires 30d;
access_log off;
}
location ~ .*/.(js|css)?$
{
expires 30d;
access_log off;
}
}
}
还有一点就是修改完配置不要忘了重启nginx:
sbin/nginx -s reload
总结
简单记录一下Linux CentOS 7中安装tengine的步骤和注意事项。

