1,安装环境
[root@node32 test]# yum groupinstall "Development Tools" -y
Installed:
byacc.x86_64 0:1.9.20130304-3.el7 cscope.x86_64 0:15.8-7.el7 ctags.x86_64 0:5.8-13.el7
diffstat.x86_64 0:1.57-4.el7 doxygen.x86_64 1:1.8.5-3.el7 gcc-gfortran.x86_64 0:4.8.5-4.el7
indent.x86_64 0:2.2.11-13.el7 intltool.noarch 0:0.50.2-6.el7 patchutils.x86_64 0:0.3.3-4.el7
rcs.x86_64 0:5.9.0-5.el7 redhat-rpm-config.noarch 0:9.1.0-68.el7.centos rpm-build.x86_64 0:4.11.3-17.el7
rpm-sign.x86_64 0:4.11.3-17.el7 subversion.x86_64 0:1.7.14-10.el7 swig.x86_64 0:2.0.10-4.el7
systemtap.x86_64 0:2.8-10.el7
Dependency Installed:
apr.x86_64 0:1.4.8-3.el7 apr-util.x86_64 0:1.5.2-6.el7 dwz.x86_64 0:0.11-3.el7
libgfortran.x86_64 0:4.8.5-4.el7 libquadmath.x86_64 0:4.8.5-4.el7 libquadmath-devel.x86_64 0:4.8.5-4.el7
mokutil.x86_64 0:0.9-2.el7 perl-XML-Parser.x86_64 0:2.41-10.el7 perl-srpm-macros.noarch 0:1-8.el7
subversion-libs.x86_64 0:1.7.14-10.el7 systemtap-client.x86_64 0:2.8-10.el7 systemtap-devel.x86_64 0:2.8-10.el7
Complete!
[root@node32 test]#
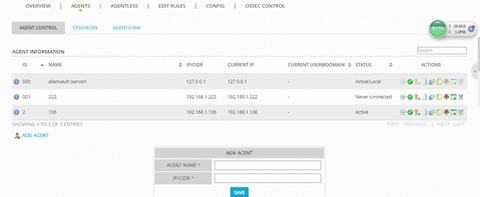
OSSIM上添加一个OSSEC的agent:

2,下载安装
# wget https://bintray.com/artifact/download/ossec/ossec-hids/ossec-hids-2.8.3.tar.gz
# tar zxvf ossec-hids-2.8.3.tar.gz
# cd ossec-hids-2.8.3/
#./install.sh
(en/br/cn/de/el/es/fr/hu/it/jp/nl/pl/ru/sr/tr) [en]:
OSSEC HIDS v2.8.3 Installation Script - http://www.ossec.net
You are about to start the installation process of the OSSEC HIDS.
You must have a C compiler pre-installed in your system.
If you have any questions or comments, please send an e-mail
to dcid@ossec.net (or daniel.cid@gmail.com).
- System: Linux node32 3.10.0-327.el7.x86_64
- User: root
- Host: node32
-- Press ENTER to continue or Ctrl-C to abort. --
下面开始设置基本信息
1- What kind of installation do you want (server, agent, local, hybrid or help)? agent
- Agent(client) installation chosen.
2- Setting up the installation environment.
- Choose where to install the OSSEC HIDS [/var/ossec]:
- Installation will be made at /var/ossec .
- The installation directory already exists. Should I delete it? (y/n) [y]:
3- Configuring the OSSEC HIDS.
3.1- What's the IP Address or hostname of the OSSEC HIDS server?: 192.168.1.136
- Adding Server IP 192.168.1.136
3.2- Do you want to run the integrity check daemon? (y/n) [y]:
- Running syscheck (integrity check daemon).
3.3- Do you want to run the rootkit detection engine? (y/n) [y]:
- Running rootcheck (rootkit detection).
3.4 - Do you want to enable active response? (y/n) [y]:
3.5- Setting the configuration to analyze the following logs:
-- /var/log/messages
-- /var/log/secure
-- /var/log/maillog
- If you want to monitor any other file, just change
the ossec.conf and add a new localfile entry.
Any questions about the configuration can be answered
by visiting us online at http://www.ossec.net .
--- Press ENTER to continue ---
设置完后就开始安装了,直到出现下面:
- System is Redhat Linux.
- Init script modified to start OSSEC HIDS during boot.
- Configuration finished properly.
- To start OSSEC HIDS:
/var/ossec/bin/ossec-control start
- To stop OSSEC HIDS:
/var/ossec/bin/ossec-control stop
- The configuration can be viewed or modified at /var/ossec/etc/ossec.conf
Thanks for using the OSSEC HIDS.
If you have any question, suggestion or if you find any bug,
contact us at contact@ossec.net or using our public maillist at
ossec-list@ossec.net
( http://www.ossec.net/main/support/ ).
More information can be found at http://www.ossec.net
--- Press ENTER to finish (maybe more information below). ---
3,配置
[root@node32 ossec-hids-2.8.3]# /var/ossec/bin/manage_agents
****************************************
* OSSEC HIDS v2.8.3 Agent manager. *
* The following options are available: *
****************************************
(I)mport key from the server (I).
(Q)uit.
Choose your action: I or Q: I
* Provide the Key generated by the server.
* The best approach is to cut and paste it.
*** OBS: Do not include spaces or new lines.
MiAxMzYgMTkyLjE2OC4xLjEzNiBkNmJkY2I5ZWM3NTkzMjI3MGRlYzAzODdlZDQ5ZGI3OWVkZTIxNGY0MDg5NGZmOTY1MjU1MjMyZTM3YmQ1ZWMz
MiAxMzYgMTkyLjE2OC4xLjEzNiBkNmJkY2I5ZWM3NTkzMjI3MGRlYzAzODdlZDQ5ZGI3OWVkZTIxNGY0MDg5NGZmOTY1MjU1MjMyZTM3YmQ1ZWMz
Agent information:
ID:2
Name:136
IP Address:192.168.1.136
Confirm adding it?(y/n): y
Added.
** Press ENTER to return to the main menu.
****************************************
* OSSEC HIDS v2.8.3 Agent manager. *
* The following options are available: *
****************************************
(I)mport key from the server (I).
(Q)uit.
Choose your action: I or Q: Q
** You must restart OSSEC for your changes to take effect.
manage_agents: Exiting ..
[root@node32 ossec-hids-2.8.3]# /var/ossec/bin/ossec-control start
Starting OSSEC HIDS v2.8.3 (by Trend Micro Inc.)...
ossec-execd already running...
2016/08/05 16:59:57 ossec-agentd: INFO: Using notify time: 600 and max time to reconnect: 1800
Started ossec-agentd...
Started ossec-logcollector...
Started ossec-syscheckd...
Completed.
[root@node32 ossec-hids-2.8.3]#
4,验证
回到ossim,看见添加的机器已经显示Active,OK。

