环境介绍:
系统:目前最新的7.2
[root@localhostnetwork-scripts]# lsb_release -a
LSBVersion: :core-4.1-amd64:core-4.1-noarch:cxx-4.1-amd64:cxx-4.1-noarch:desktop-4.1-amd64:desktop-4.1-noarch:languages-4.1-amd64:languages-4.1-noarch:printing-4.1-amd64:printing-4.1-noarch
DistributorID: CentOS
Description: CentOSLinux release 7.2.1511 (Core)
Release: 7.2.1511
Codename: Core
网络:
VMware虚拟机,添加5块网卡都配置NAT,有一块负责跟主机ssh。
1、环境准备
centos 7是最小化安装,启动后看一下网卡IP,可以通过 ssh 连接了,先安装几个网络管理工具,像 ifconfig默认都没有安装。
yum -y install vimwget pciutils net-tools
2、查看网络设备
[root@localhostnetwork-scripts]# nmcli device status
DEVICE TYPE STATE CONNECTION
eno16777736 ethernet connected eno16777736
eno83886664 ethernet connected Wired connection 1
eno33554960 ethernet disconnected --
eno50332216 ethernet disconnected --
eno67109440 ethernet disconnected --
lo loopback unmanaged --
DEVICE列能看到我们有5块网卡,名字为什么这么奇怪可以看命名规则的文章,因为我这用的是虚拟机,eno后的数字比较长,如果是在真实服务器上,你应该能看到eno1、eno2 ……,下图是网卡的配置文件,系统会自动创建,但也有可能没有,原因我也不清楚,没有也没关系,可以自己创建,所以如果你发现自己的服务器没有网卡配置文件也不要奇怪。

上面nmcli device status命令的输出结果我们再看一下,STATE状态这一行有connected和 disconnected,我一开始以为是有没有连接网线的,后来发现是表示有没有正确获取IP地址,上面的结果显示只有两块网卡正确获取IP,可能有朋友会问那不接网线会显示什么呢?
[root@localhostnetwork-scripts]# nmcli dev sta
DEVICE TYPE STATE CONNECTION
eno83886664 ethernet connected Wired connection 1
eno33554960 ethernet disconnected --
eno50332216 ethernet disconnected --
eno67109440 ethernet disconnected --
eno16777736 ethernet unavailable --
lo loopback unmanaged --
不接网线网络肯定没法用,所以显示unavailable网络不可用。细心的朋友有没有发现nmcli命令的不同,可以使用缩写,不知道红帽有没有借鉴思科,nmcli device status 可以缩写成 nmcli d s,命令不能缩写啊,可以补全,呵呵。
好了,网卡介绍就到这,下面我们看一下网卡的分配:
eno16777736 -- eno1 -- bond 0 (外网)
eno33554960 -- eno2-- bond 0
eno50332216 -- eno3 -- bond 1(内网)
eno67109440 -- eno4-- bond 1
eno83886664 -- NAT
bond 0连接外网, bond 1连接内网,为了以后方便对网卡操作可以在配置文件中修改设备名。
3、配置Bonding
Centos 7 提供三种方式配置
nmtui
nmcli
cli
nmtui是一种图形化方式,刚开始可以使用这种方式。(配置bond会对网卡重新生成配置文件,系统自动生成的可以删除),我们先使用nmtui来配置。
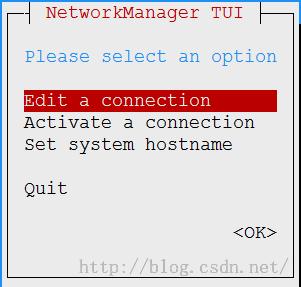
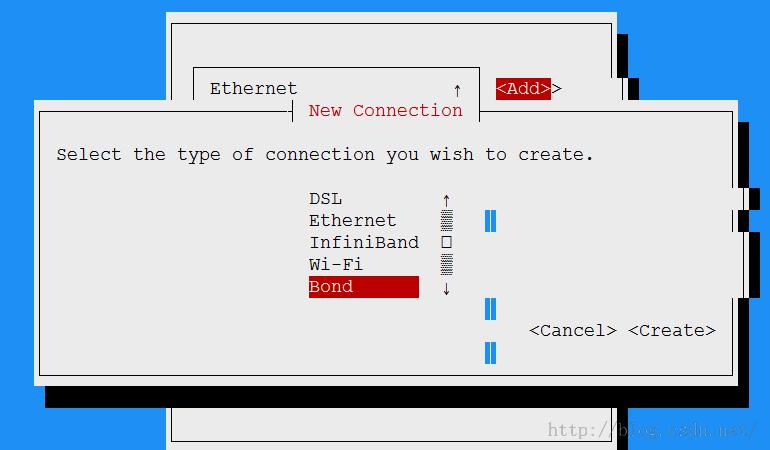
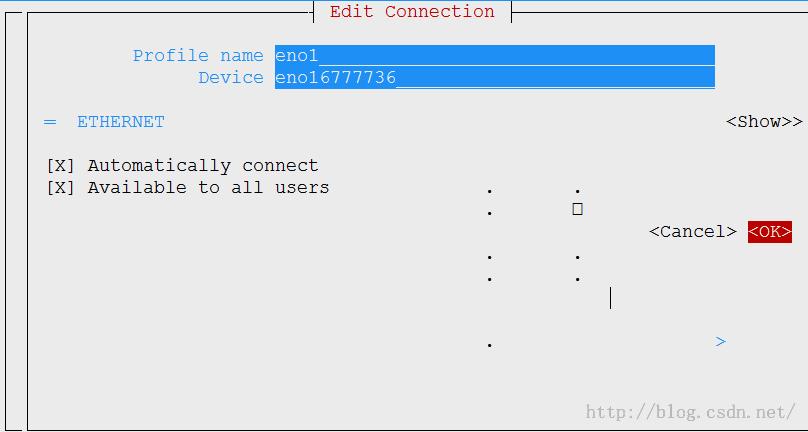
配置完成后会生成三个配置文件,

配置文件可以精简一下:
[root@localhostnetwork-scripts]# cat ifcfg-bond0
DEVICE=bond0
TYPE=Bond
BONDING_MASTER=yes
BOOTPROTO=static
NAME=bond0
ONBOOT=yes
BONDING_OPTS="resend_igmp=1updelay=0 use_carrier=1 miimon=100 downdelay=0 xmit_hash_policy=0primary_reselect=0 fail_over_mac=0 arp_validate=0 mode=balance-rr lacp_rate=0arp_interval=0 ad_select=0"
IPADDR=192.168.64.20
NETMASK=255.255.255.0
GATEWAY=192.168.64.2
DNS1=192.168.64.1
[root@localhostnetwork-scripts]# cat ifcfg-eno1
TYPE=Ethernet
NAME=eno1
DEVICE=eno16777736
ONBOOT=yes
MASTER=bond0
SLAVE=yes
[root@localhostnetwork-scripts]# cat ifcfg-eno2
TYPE=Ethernet
NAME=eno2
DEVICE=eno33554960
ONBOOT=yes
MASTER=bond0
SLAVE=yes
重启服务:
[root@localhostnetwork-scripts]# nmcli conn reload
[root@localhostnetwork-scripts]# systemctl restart network
][root@localhostnetwork-scripts]# nmcli dev sta
DEVICE TYPE STATE CONNECTION
bond0 bond connected bond0
eno16777736 ethernet connected eno1
eno33554960 ethernet connected eno2
eno83886664 ethernet connected Wired connection 1
eno50332216 ethernet disconnected --
eno67109440 ethernet disconnected --
lo loopback unmanaged --
[root@localhostnetwork-scripts]# ifconfig bond0
bond0:flags=5187<UP,BROADCAST,RUNNING,MASTER,MULTICAST> mtu 1500
inet 192.168.220.20 netmask 255.255.255.0 broadcast 192.168.220.255
inet6 fe80::4d1:d2ff:fe5b:804a prefixlen 64 scopeid 0x20<link>
ether 00:0c:29:d7:dc:0d txqueuelen 0 (Ethernet)
RX packets 8 bytes 690 (690.0 B)
RX errors 0 dropped 0 overruns 0 frame 0
TX packets 2 bytes 138 (138.0 B)
TX errors 0 dropped 0 overruns 0 carrier 0 collisions 0
4、bond测试
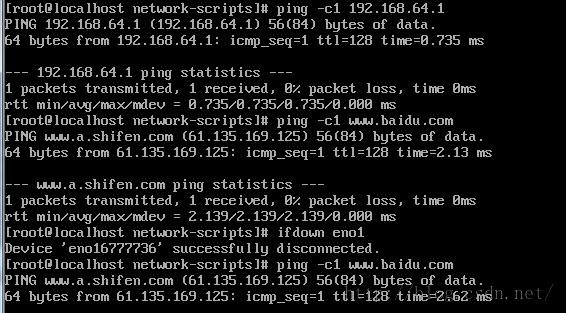
我们的环境一共有5块网卡,2块刚才配置成bond0,有2块没有配置,也就没有IP,有1块用来连接ssh的有Ip地址,需要停用掉,否则影响实验效果,使用 ifdown 设备名将设备停用,详见下图:
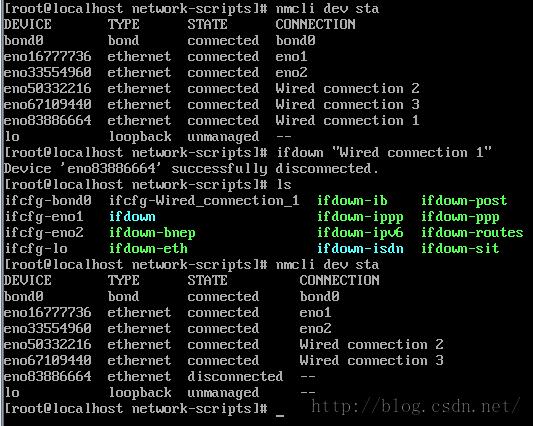
最后使用 ip addr命令查看,确保只有bond0有ip地址就可以了,其他接口都使用ifdown停掉。
测试时使用 ifdown eno1断开一块网卡再测试。
5、CLI配置Bonding
可以直接修改配置文件来配置bonding,将之前的配置文件复制一份,把IP地址、device名称修改一下就可以了。
[root@localhostnetwork-scripts]# cat ifcfg-bond1
DEVICE=bond1
TYPE=Bond
BONDING_MASTER=yes
BOOTPROTO=static
NAME=bond1
ONBOOT=yes
BONDING_OPTS="resend_igmp=1updelay=0 use_carrier=1 miimon=100 downdelay=0 xmit_hash_policy=0primary_reselect=0 fail_over_mac=0 arp_validate=0 mode=balance-rr lacp_rate=0arp_interval=0 ad_select=0"
IPADDR=192.168.64.30
NETMASK=255.255.255.0
GATEWAY=192.168.64.2
DNS1=192.168.64.2
[root@localhostnetwork-scripts]# cat ifcfg-eno3
TYPE=Ethernet
NAME=eno3
DEVICE=eno67109440
ONBOOT=yes
MASTER=bond1
SLAVE=yes
[root@localhostnetwork-scripts]# cat ifcfg-eno4
TYPE=Ethernet
NAME=eno4
DEVICE=eno50332216
ONBOOT=yes
MASTER=bond1
SLAVE=yes
重启网络服务,service命令系统还支持,但会提示转给 systemctl,可以直接使用 systemctl重启服务。

测试一下应该没问题的,所以以后要配置bond,可以直接修改配置文件就可以了。
6、使用nmcli命令创建Bonding
nmcli con add type bond ifname bond0 mode balance-rr #创建master,模式为round-robin
nmcli con add type bond-slave ifname eno1 master bond0 #添加eno1为slave
nmcli con add type bond-slave ifname eno2 master bond0 #添加eno2为slave

