这个脚本是使用shell编写,为了快速在生产环境上部署lnmp/lamp/lnmpa(Linux、Nginx/Tengine、MySQL/MariaDB/Percona、PHP),适用于CentOS 5~7(包括redhat)、Debian 6~8、Ubuntu 12.04~15.04的32位和64位。
脚本特性
持续不断更新
源码编译安装,大多数源码是最新stable版,并从官方网址下载
一些安全优化
提供多个数据库版本(MySQL-5.6, MySQL-5.5, MariaDB-10.0, MariaDB-5.5, Percona-5.6, Percona-5.5)
提供多个PHP版本(php-5.3, php-5.4, php-5.5,php-5.6,php-7/phpng(alpha))
提供Nginx、Tengine
提供多个Apache版本(Apache-2.4,Apache-2.2)
根据自己需求安装PHP缓存加速器,提供ZendOPcache、xcache、apcu、eAccelerator。及php加解密工具ionCube、ZendGuardLoader
根据自己需求安装Pureftpd、phpMyAdmin
根据自己需求安装memcached、redis
根据自己需求可使用tcmalloc或者jemalloc优化MySQL、Nginx
提供添加虚拟主机脚本
提供Nginx/Tengine、PHP、Redis、phpMyAdmin升级脚本
提供本地备份和远程备份(服务器之间rsync)脚本
提供CentOS 6、7下HHVM安装
Github地址:https://github.com/lj2007331/lnmp
lnmp问题反馈论坛:http://bbs.linuxeye.com
lnmp一键安装包脚本问题反馈请加QQ:
1456512210
安装步骤
yum -y install wget screen #for CentOS/Redhat
#apt-get -y install wget screen # for Debian/Ubuntu
wget http://aliyun-oss.linuxeye.com/lnmp-full.tar.gz #阿里云用户下载
wget http://mirrors.linuxeye.com/lnmp-full.tar.gz # 包含源码,国内外均可下载
wget http://mirrors.linuxeye.com/lnmp.tar.gz # 不包含源码,建议仅国外主机下载
tar xzf lnmp-full.tar.gz
#tar xzf lnmp.tar.gz
cd lnmp # 如果需要修改目录(安装、数据存储、Nginx日志),请修改options.conf文件
screen -S lnmp # 如果网路出现中断,可以执行命令`screen -r lnmp`重新连接安装窗口
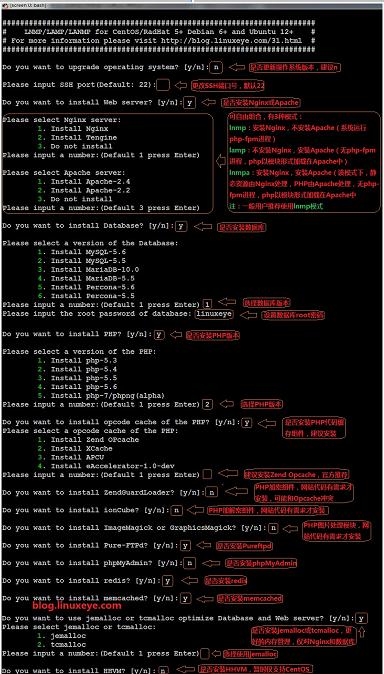
./install.sh # 请勿sh install.sh或者bash install.sh这样执行
如下图

添加虚拟主机
cd ~/lnmp # 必须进入lnmp目录下执行
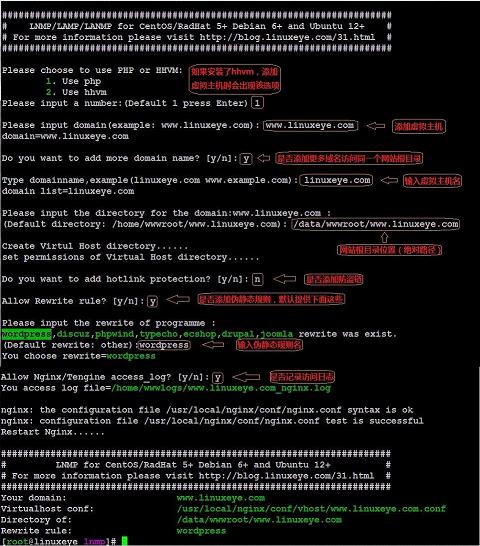
./vhost.sh
如下图

Pure-FTPd虚拟用户账号管理
cd ~/lnmp # 必须进入lnmp目录下执行
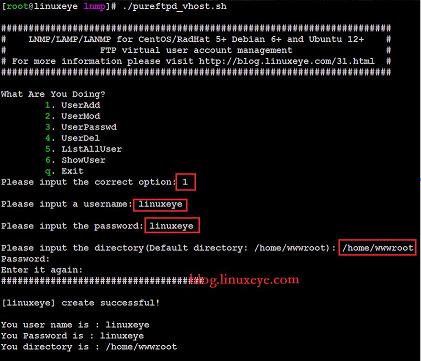
./pureftpd_vhost.sh
如下图

数据备份
cd ~/lnmp # 必须进入lnmp目录下执行
./backup_setup.sh # 备份参数设置
./backup.sh # 立即执行备份
crontab -e # 可添加到计划任务,如每天凌晨1点自动备份
0 1 * * * cd ~/lnmp;./backup.sh > /dev/null 2>&1 &
备份参数设置如下图:

管理服务
Nginx/Tengine:
service nginx {start|stop|status|restart|condrestart|try-restart|reload|force-reload|configtest}
MySQL/MariaDB/Percona:
service mysqld {start|stop|restart|reload|force-reload|status}
PHP:
service php-fpm {start|stop|force-quit|restart|reload|status}
Apache:
service httpd {start|restart|graceful|graceful-stop|stop}
Pure-Ftpd:
service pureftpd {start|stop|restart|condrestart|status}
Redis:
service redis-server {start|stop|status|restart|condrestart|try-restart|reload|force-reload}
Memcached:
service memcached {start|stop|status|restart|reload|force-reload}
版本升级
cd ~/lnmp # 必须进入lnmp目录下执行
./upgrade_php.sh #升级PHP(小版本升级,如需跨大版本升级,可如下操作service php-fpm stop; mv /usr/local/php{,_bk};./install.sh php选y,其余n)
./upgrade_web.sh #升级Nginx/Tengine
./upgrade_redis.sh #升级Redis
./upgrade_phpmyadmin.sh #升级phpMyAdmin
卸载lnmp
cd ~/lnmp # 必须进入lnmp目录下执行
./uninstall.sh
重装lnmp
cd ~/lnmp # 必须进入lnmp目录下执行
./uninstall.sh #备份数据;卸载
./install.sh#再次安装
最后做magento的域名解析
进入/usr/local/nginx/conf 在这个文件里创建magento.conf文件 代码如下:
location @handler { ## Magento uses a common front handler
rewrite / /index.php;
}
location ~ .php/ { ## Forward paths like /js/index.php/x.js to relevant handler
rewrite ^(.*.php)/ $1 last;
}
if (!-e $request_filename) {
rewrite ^(.+)$ /index.php last;
}
location /app/ { deny all; }
location /includes/ { deny all; }
location /lib/ { deny all; }
location /media/downloadable/ { deny all; }
location /pkginfo/ { deny all; }
location /report/config.xml { deny all; }
location /var/ { deny all; }
location ~ ^(.*)\/\.svn\/{deny all;}
然后在/usr/local/nginx/conf创建vhost文件夹
cd /usr/local/nginx/conf/vhost 进入这个文件夹中创建ugomi.conf文件
server
{
listen 80;
#listen [::]:80;
server_name test.ugomi.con;
index index.html index.htm index.php default.html default.htm default.php;
root /home/wwwroot/ugomi;
include magento.conf;
#error_page 404 /404.html;
location ~ [^/]\.php(/|$)
{
# comment try_files $uri =404; to enable pathinfo
try_files $uri =404;
fastcgi_pass unix:/tmp/php-cgi.sock;
fastcgi_index index.php;
include fastcgi.conf;
#include pathinfo.conf;
}
location ~ .*\.(gif|jpg|jpeg|png|bmp|swf)$
{
expires 30d;
}
location ~ .*\.(js|css)?$
{
expires 12h;
}
access_log off;
}
最后重启nginx服务,/etc/init.d/nginx restart 如是有效域名就可以直接访问即可。
CentOS上的LNMP一键安装工具Centmin Mod:http://www.linuxdiyf.com/linux/12023.html
CentOS下一键安装OpenStack:http://www.linuxdiyf.com/linux/11447.html
Linux下一键安装PowerShell的bash脚本:http://www.linuxdiyf.com/linux/8562.html
Shell下一键安装Hadoop:http://www.linuxdiyf.com/linux/5497.html
RHEL6.4下一键安装Redmine:http://www.linuxdiyf.com/linux/1486.html

