总体说Maven Plugin开发算是比较简单,了解了Mojo之后,实现起Maven Plugin的一个个goal就更加轻松了。
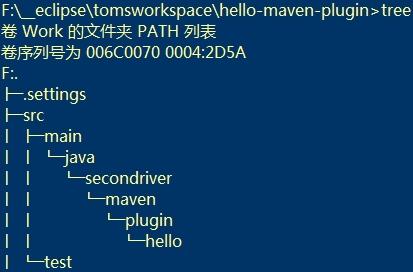
由于发现在通过eclipse或者archetype创建Maven工程之后,src下的目录时而不完整,于是打起开发一个Maven Plugin的主意。该插件命名为:hello-maven-plugin,此外Apache Maven官方声明过Maven Plugin命名需要注意的问题,Maven官方的Plugin命名格式为:maven-<plugin name>-plugin,其它个人或者组织可以使用<plugin name>-maven-plugin命名,当然不限于此。不过使用这种命名格式有个好处是在使用Plugin的时候可以通过 mvn plugin:goal 命令来进行操作,可以省去完整限定名。
下面将是开发该插件的具体步骤:
1.创建hello-maven-plugin的Maven工程
2.在pom.xml中添加依赖和maven-plugin-plugin插件
<dependencies>
<dependency>
<groupId>org.apache.maven</groupId>
<artifactId>maven-plugin-api</artifactId>
<version>2.0</version>
</dependency>
<dependency>
<groupId>org.apache.maven.plugin-tools</groupId>
<artifactId>maven-plugin-annotations</artifactId>
<version>3.4</version>
<scope>provided</scope>
</dependency>
<dependency>
<groupId>org.apache.maven</groupId>
<artifactId>maven-core</artifactId>
<version>3.1.0</version>
</dependency>
</dependencies>
<plugin>
<groupId>org.apache.maven.plugins</groupId>
<artifactId>maven-plugin-plugin</artifactId>
<version>3.4</version>
<executions>
<execution>
<id>default-descriptor</id>
<phase>process-classes</phase>
</execution>
</executions>
</plugin>
需要注意的事,Mojo对象的通过Java doc Tag或者Java Annotation的注释的方式都可以通过处理生产plugin.xml的描述文件,这里使用Java Annotation。
详情:http://maven.apache.org/plugin-tools/maven-plugin-annotations/index.html
3.编写Mojo
通常一个Plugin中可能有多个goal,这里我们把多个Mojo的共同部分提取到父类,该父类是抽象类,并未实现execute方法,而是由每个实现特定goal的Mojo来实现。
package secondriver.maven.plugin.hello;
import org.apache.maven.plugin.AbstractMojo;
public abstract class BaseMojo extends AbstractMojo {
public void printLine() {
getLog().info(
"------------------------------------------------------------------------");
}
}
package secondriver.maven.plugin.hello;
import java.io.File;
import org.apache.maven.plugin.MojoExecutionException;
import org.apache.maven.plugin.MojoFailureException;
import org.apache.maven.plugins.annotations.LifecyclePhase;
import org.apache.maven.plugins.annotations.Mojo;
import org.apache.maven.plugins.annotations.Parameter;
import org.apache.maven.project.MavenProject;
@Mojo(name = "fixdir", requiresProject = true, threadSafe = true, defaultPhase = LifecyclePhase.NONE)
public class FixDir extends BaseMojo {
@Parameter(defaultValue = "${project}")
private MavenProject project;
@Parameter(defaultValue = "${project.basedir}", readonly = true)
private File baseDir;
private String srcDir = "/src";
private String mainJava = "/main/java";
private String mainResources = "/main/resources";
private String testJava = "/test/java";
private String testResources = "/test/resources";
@Parameter(name = "packageName", property = "fixdir.packageName", defaultValue = "${project.groupId}", required = true)
private String packageName;
public void execute() throws MojoExecutionException, MojoFailureException {
String packagePath = packageName.replace(".", File.separator);
// 创建关于main的目录
mkdirs(mainJava + File.separator + packagePath);
mkdirs(mainResources);
// 创建关于test的目录
mkdirs(testJava + File.separator + packagePath);
mkdirs(testResources);
}
private void mkdirs(String path) throws MojoFailureException {
File file = new File(baseDir, srcDir + File.separator + path);
if (!file.exists()) {
if (file.mkdirs()) {
getLog().info(path + " created OK.");
} else {
getLog().error(path + " created Failed.");
throw new MojoFailureException("Fix " + mainJava + ", "
+ mainResources + ", " + testJava + ", "
+ testResources + " Failed.");
}
}
}
}
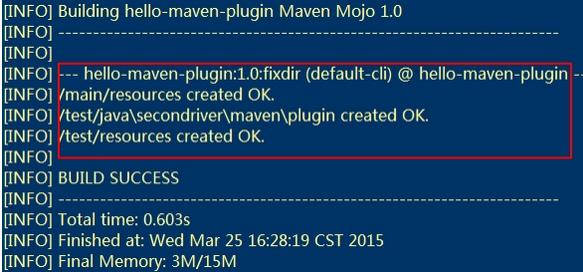
上面的FixDirMojo实现了fixdir goal,其具体功能就是文中开始提到的将src的目录补完整(特别说一个,按照Maven工程的实际使用,这里并不完整,比如assembly,profile目录等都未创建)。
限于篇幅有关Annotation的具体使用可以参见:http://maven.apache.org/plugin-tools/maven-plugin-tools-annotations/index.html#Supported_Annotations
另外一个最好不过的方式就是通过Java Decompiler工具将现有个Maven Plugin反编译之后看看这些注解的具体使用。
4.编译,生成Plugin的描述文件,发布
hello-maven-plugin>mvn compiler:compile
hello-maven-plugin>mvn plugin:descriptor
hello-maven-plugin>mvn install
也可以直接执行:mvn install
通过plugin:descriptor将对Mojo进行处理,生成plugin.xml。关于描述下面是其中一部分摘取:
<plugin>
<name>hello-maven-plugin Maven Mojo</name>
<description></description>
<groupId>secondriver.maven.plugin</groupId>
<artifactId>hello-maven-plugin</artifactId>
<version>1.0</version>
<goalPrefix>hello</goalPrefix>
<isolatedRealm>false</isolatedRealm>
<inheritedByDefault>true</inheritedByDefault>
<mojos>
<mojo>
<goal>fixdir</goal>
<requiresDirectInvocation>false</requiresDirectInvocation>
<requiresProject>true</requiresProject>
<requiresReports>false</requiresReports>
<aggregator>false</aggregator>
<requiresOnline>false</requiresOnline>
<inheritedByDefault>true</inheritedByDefault>
<implementation>secondriver.maven.plugin.hello.FixDir</implementation>
<language>java</language>
<instantiationStrategy>per-lookup</instantiationStrategy>
<executionStrategy>once-per-session</executionStrategy>
<threadSafe>true</threadSafe>
<parameters>
<parameter>
<name>baseDir</name>
<type>java.io.File</type>
<required>false</required>
<editable>false</editable>
<description></description>
</parameter>
<parameter>
<name>packageName</name>
<type>java.lang.String</type>
<required>true</required>
<editable>true</editable>
<description></description>
</parameter>
<parameter>
<name>project</name>
<type>org.apache.maven.project.MavenProject</type>
<required>false</required>
<editable>true</editable>
<description></description>
</parameter>
</parameters>
<configuration>
<baseDir implementation="java.io.File" default-value="${project.basedir}"/>
<packageName implementation="java.lang.String" default-value="${project.groupId}">${fixdir.packageName}</packageName>
<project implementation="org.apache.maven.project.MavenProject" default-value="${project}"/>
</configuration>
</mojo>
</mojos>
</plugin>
5.在Maven工程中添加hello-maven-plugin,并且使用其中功能
<plugin>
<groupId>secondriver.maven.plugin</groupId>
<artifactId>hello-maven-plugin</artifactId>
<version>1.0</version>
</plugin>
执行 mvn hello:fixdir或者mvn secondriver.maven.plugin:hello:1.0:fixdir命令,修复src下的目录。
注:以上图片上传到红联Linux系统教程频道中。
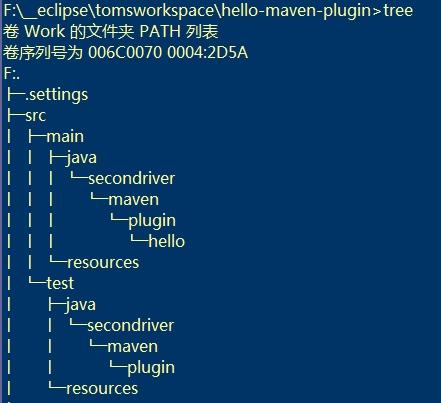
通过对吧前后两幅目录树可以看出执行fixdir之后,test目录下结构完整了。
6.写在最后
本文只是通过创建一个简单的Maven Plugin解决实际中遇到的一个问题,其具备了功能性,但离一个合格的Maven Plugin的完整性还差好远。比如:Maven Plugin的参数说明,帮助文档,参数检查等。更多关于Maven Plugin开发还得去官网开开发文档(有点小凌乱),还有就是反编译已有的成熟Maven Plugin。


