安装XAMPP
去xampp官网下载对应版本,ubuntu会下载.run文件。
sudo mv xampp-linux-x64-5.6.19-0-installer.run /opt/
cd /opt/
sudo -s
chmod 755 xampp-linux-x64-5.6.19-0-installer.run
./xampp-linux-x64-5.6.19-0-installer.run
依次执行上面命令,就会打开xampp的安装窗口,安装就好。
vscode安装插件
ctrl-p调出控制,输入
ext install php-debug.
安装完毕,然后在vscode的usersetting里添加如下:
{
// Points to the php executable.
"php.validate.executablePath": "/opt/lampp/bin/php"
}
指定php的路径,然后需要配置xdebug。
配置xdebug
首先去xdebug官网下载source,然后执行如下命令解压:
tar -zxf xdebug-2.4.0.tgz
执行phpize
cd xdebug-2.4.0/
/opt/lampp/bin/phpize
显示如下,
Configuring for:
PHP Api Version: 20131106
Zend Module Api No: 20131226
Zend Extension Api No: 220131226
Cannot find autoconf. Please check your autoconf installation and the
$PHP_AUTOCONF environment variable. Then, rerun this script.
从提示看出我是缺了东西了,那就装上,执行命令如下
sudo apt-get install autoconf
再次执行
/opt/lampp/bin/phpize
Configuring for:
PHP Api Version: 20131106
Zend Module Api No: 20131226
Zend Extension Api No: 220131226
现在可以看出是正常了,可以继续了。
./configure –enable-xdebug –with-php-config=/opt/lampp/bin/php-config
sudo make
执行后显示
xxxxxxxxxxxxxx
-------------------------------------------
Build complete.
Don't forget to run 'make test'.
那我就试一试。
make test
Build complete.
Don't forget to run 'make test'.
==========================================
PHP : /opt/lampp/bin/php
PHP_SAPI: cli
PHP_VERSION : 5.6.19
ZEND_VERSION: 2.6.0
PHP_OS : Linux - Linux jacean-Ubuntu 4.2.0-34-generic #39-Ubuntu SMP Thu Mar 10 22:13:01 UTC 2016 x86_64
INI actual : /home/jacean/文档/xdebug-2.4.0/tmp-php.ini
More .INIs :
CWD : /home/jacean/文档/xdebug-2.4.0
Extra dirs :
VALGRIND: Not used
=========================================
TIME START 2016-04-04 08:30:01
=========================================
No tests were run.
然后安装
sudo make install
Installing shared extensions: /opt/lampp/lib/php/extensions/no-debug-non-zts-20131226/
+-------------------------------------------+
| |
| INSTALLATION INSTRUCTIONS |
| ========================= |
| |
| See http://xdebug.org/install.php#configure-php for instructions |
| on how to enable Xdebug for PHP. |
| |
| Documentation is available online as well: |
| - A list of all settings: http://xdebug.org/docs-settings.php |
| - A list of all functions: http://xdebug.org/docs-functions.php|
| - Profiling instructions: http://xdebug.org/docs-profiling2.php |
| - Remote debugging:http://xdebug.org/docs-debugger.php |
| |
| |
| NOTE: Please disregard the message |
| You should add "extension=xdebug.so" to php.ini|
| that is emitted by the PECL installer. This does not work for |
| Xdebug.|
| |
+-------------------------------------------+
接下来就是配置php.ini,
sudo gvim /opt/lampp/etc/php.ini
末尾添加
[Xdebug]
zend_extension=/opt/lampp/lib/php/extensions/no-debug-non-zts-20131226/xdebug.so
xdebug.profiler_enable=on
xdebug.trace_output_dir="../xdebug"
xdebug.profile_output_dir="../xdebug"
xdebug.remote_enable = 1//这两行远程是配合vscode的
xdebug.remote_autostart = 1
然后重启xampp,在phpinfo页面就可以看到有关xdebug的信息了。
启动调试
xampp默认的网站根目录是htdocs,因为/opt/lamp/htdocs的操作是需要root权限的,很不方便,所以就把根目录改一下。
mkdir ~/workspace/WEB
然后修改httpd.conf,在/opt/lamp/etc下。
sudo gvim httpd.conf
修改
# DocumentRoot "/opt/lampp/htdocs"
# < Directory "/opt/lampp/htdocs">
DocumentRoot "/home/jacean/workspace/WEB"
< Directory "/home/jacean/workspace/WEB">
我在<>之间加了一个空格,是为了避免markdown格式显示,应该删掉。
然后,在WEB目录下新建index.php,保存。
<?php
$a=1;
$b=2;
$c=$a-$b;
$d=$c+$b;
echo '<strong>hello world!</strong>';
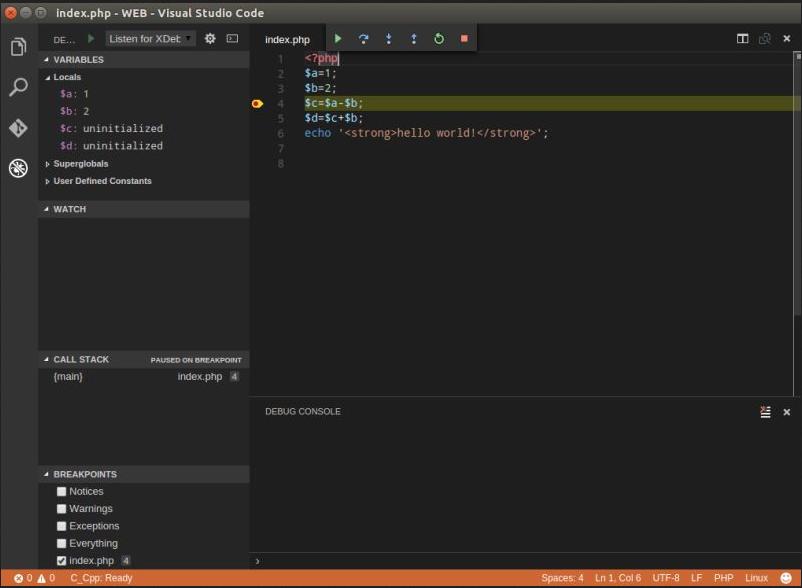
然后加断点,比如我加到$c那一行。
记得在debug栏中选择设置齿轮,在下拉中选中php debug,会自动生成lanch.json文件,
然后再点击绿三角运行。
启动调试监听,
重启xampp,进入localhost。可以看到vscode自动弹出并标识在断点处,此时可以查看变量等等常用调试操作。

至此,大功告成!
xampp启动
要启动xampp桌面程序,可以在命令行输入
cd /opt/lampp
sudo ./manager-linux-x64.run
直接命令行启动
lampp start
lampp stop
lampp restart
只启动和停止Apache:
/opt/lampp/lampp startapache(stopapache)
只启动和停止MySQL:
/opt/lampp/lampp startmysql(stopmysql)
只启动和停止ProFTPD服务器:
/opt/lampp/lampp startftp(stopftp)
启动和停止Apache的SSL支持:
/opt/lampp/lampp startssl(stopssl)
取消自启动:
ln –s /opt/lampp/lampp K01lampp
卸载XAMPP:
rm –rf /opt/lampp

