什么是graphite?
先看看是怎么介绍
Graphite 是一个Python写的web应用,采用django框架,Graphite用来进行收集服务器所有的即时状态,用户请求信息,Memcached命中率,RabbitMQ消息服务器的状态,Unix操作系统的负载状态,Graphite服务器大约每分钟需要有4800次更新操作,Graphite采用简单的文本协议和绘图功能可以方便地使用在任何操作系统上。
讲的还算是比较清楚了,Graphite是用来监控系统的,比如操作系统,缓存服务系统等,但是监控的数据怎么得到呢?Graphite并不负责,它只负责显示,数据哪里来人家不care,你只要按照他的数据格式给它,Graphite就可以机智的用漂亮的页面显示给你,不过不用担心,graphite的安装的一系列套件,提供了API去传数据给它,而且数据如何存储的也不用我们担心,只管发数据给它就行。说的这么好,到底怎么安装呢?
先别急,事情总不是那么完美,Graphite不支持windows,因此对于只使用Windows的Coder就有点小失落了,不过没关系,相信作为程序员都是有办法的,这些都是小事情。
下面就进入Graphite的世界!
安装
操作系统:Ubuntu 14.04
Python :2.7.6
安装graphite的环境
Graphite的需要的支持环境如下:
* a UNIX-like Operating System
* Python 2.6 or greater
* Pycairo
* Django 1.4 or greater
* django-tagging 0.3.1 or greater
* Twisted 8.0 or greater (10.0+ recommended)
* zope-interface (often included in Twisted package dependency)
* pytz
* fontconfig and at least one font package (a system package usually)
* A WSGI server and web server. Popular choices are:
* Apache with mod_wsgi
* gunicorn with nginx
* uWSGI with nginx
Ubuntu已经安装了python,所以不需要安装再安装了,只用确保版本大于等于2.6即可。这里我们服务器选择Apache,如果已经安装了就不用安装了,只用安装WSGI的模块libapache2-mod-wsgi。
下面是安装所有支持环境的命令,建议一个一个安装,可以查看每个安装成功与否。
$sudo apt-get update
$ sudo apt-get install apache2 libapache2-mod-wsgi python-django python-twisted python-cairo python-pip python-django-tagging
安装Graphite三大组件
whisper(数据库)
carbon(监控数据,默认端口2003,外部程序StatsD通过这个端口,向Graphite输送采样的数据)
graphite-web(网页UI)
使用pip命令可以快速的安装
$sudo pip install whisper
$sudo pip install carbon
$sudo pip install graphite-web
安装完成后默认在/opt/graphite目录
然后使用Pip安装pytz,用于转换TIME_ZONE,后面会介绍
$ sudo pip install pytz
配置graphite
进入/opt/graphite/conf目录,使用给的example配置
$ sudo cp carbon.conf.example carbon.conf
$ sudo cp storage-schemas.conf.example storage-schemas.conf
$ sudo cp graphite.wsgi.example graphite.wsgi
为apache添加Graphite的虚拟主机
安装graphite的时候会生成一个/opt/graphite/example的文件夹,里面有一个配置好的虚拟主机文件,将其复制到Apache放置虚拟主机的配置文件的地方,默认是/etc/apache2/sites-available文件夹
$sudo cp /opt/graphite/example/example-graphite-vhost.conf /etc/apache2/sites-available/graphite-vhost.conf
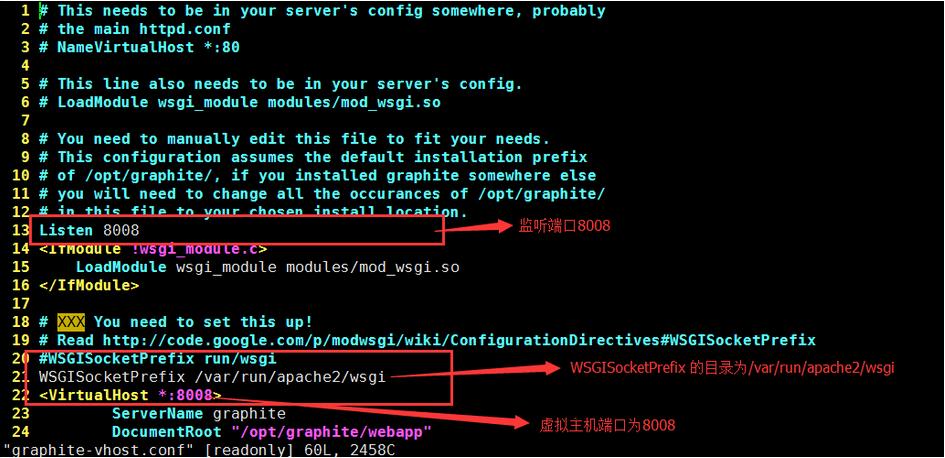
然后在编辑修改监听端口为8008以及一个WSGISocketPrefix的默认目录,修改后如下:

在/etc/apache2/sites-enable下建立该配置文件的软链接
$cd /etc/apache2/sites-enable
$sudo ln -s ../sites-available/graphite-vhost.conf graphite-vhost.conf
初始化数据库
初始化 graphite需要的数据库,修改 storage 的权限,用拷贝的方式创建 local_settings.py文件(中间会问你是不是要创建一个superuser,选择no,把<用户名>改成你当前的Ubuntu的用户名,这是为了让carbon有权限写入whisper数据库,其实carbon里面也可以指定用户的,更新:graphite需要admin权限的用户才能创建User Graph,所以superuser是很重要的,可以使用 python manage.py createsuperuser创建):
$ cd /opt/graphite/webapp/graphite/
$ sudo python manage.py syncdb
$ sudo chown -R <用户名>:<用户名> /opt/graphite/storage/
$ sudo cp local_settings.py.example local_settings.py
$ sudo /etc/init.d/apache2 restart #重启apache
上面代码中的用户名为Apache对应的用户,一般为www-data,可以使用下面的代码获得,在apache的web根目录(默认:var/www/html)穿件control.php
<?php
echo exec("whoami");
?>
在浏览器访问http://localhost/control.php既可以看到对应的用户名
启动Carbon
$ cd /opt/graphite/
$ sudo ./bin/carbon-cache.py start
此时在浏览器访问http://localhost:8008,看到下面页面说明配置成功

如果出现没有权限访问的错误页面,可以修改Apache配置文件/etc/pache2/apache2.conf,找到下图中的位置,注释掉Require all denied ,然后重启Apache再次访问。

修改Graphite默认的时区
打开/opt/graphite/webapp/graphite/setting.py,找到TIME_ZONE,默认是UTC,将其修改为Asia/Shanghai,然后找到USE_TZ,没有的话自己在文件末尾添加,设置为True。
发送数据到graphite
发送数据的方法比较多,科一参考官方文档Feeding In Your Data(http://graphite.readthedocs.org/en/latest/feeding-carbon.html),此外,在/opt/graphite/examples下提供了一份通过Socket发送数据的例子examples-client.py。
Graphite官方文档:Graphite官方文档(http://graphite.readthedocs.org/en/latest/index.html)
10个免费的服务器监控工具:http://www.linuxdiyf.com/linux/12736.html
4个Linux服务器监控工具:http://www.linuxdiyf.com/linux/11393.html
系统之锹sysdig:Linux服务器监控和排障利器:http://www.linuxdiyf.com/linux/10315.html
Ubuntu Server安装部署Cacti服务器监控:http://www.linuxdiyf.com/linux/12021.html
在Ubuntu 14.10上安装基于Web的监控工具:Linux-Dash:http://www.linuxdiyf.com/linux/12210.html

