在这篇文章中,我们将介绍如何在QML中使用C++代码。在以前的文章“ 使用C++拓展QML 类型及Property binding!”(http://blog.csdn.net/ubuntutouch/article/details/38579653)中,我们可以可以通过C++ plugin的方法来拓展我们的QML功能。那个项目是CMake项目。对于qmake项目来说,我们也可以做同样的事。可以使用一个plugin,并在QML中调用它。
今天,我们将不使用plugin的方法,我们希望在qmake项目中直接调用C++代码。那么我们将如何做呢?这里注意qmake只对15.04及以上的ubuntu手机image (模拟器及手机)适用。
1)创建一个最基本的qmake应用
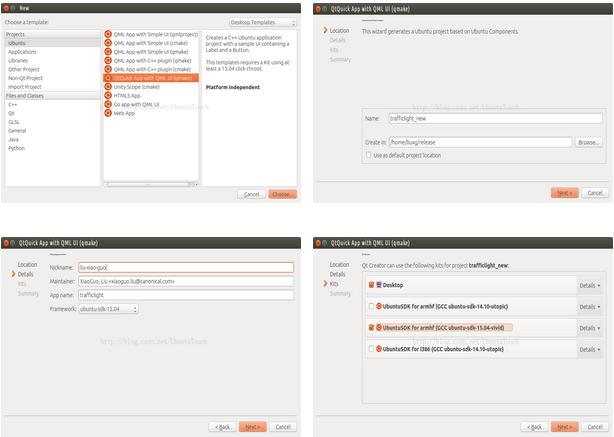
我们使用我们的SDK,并使用“QtQuick App with QML UI (qmake)”模版。具体步骤如下:

这样我们就创建了我们一个最基本的QML和C++的混合应用(qmake)。
2)加入我们需要的文件
我们把上次我们做过的trafficlight的代码下载到我们想要的目录:
git clone https://gitcafe.com/ubuntu/trafficlight.git
并把其中的“trafficlight.cpp”及“trafficlight.h”考入到我们项目的源码的目录中(位于main.cpp所在的目录中)。为了能够编译我们新加入的trafficlight.cpp文件, 我们需要对trafficligth.pro文件做写修改:
TEMPLATE = app
TARGET = trafficlight
load(ubuntu-click)
QT += core qml quick
SOURCES += main.cpp trafficlight.cpp
HEADERS += trafficlight.h
RESOURCES += trafficlight.qrc
OTHER_FILES += trafficlight.apparmor \
trafficlight.desktop \
trafficlight.png
#specify where the config files are installed to
config_files.path = /trafficlight
config_files.files += $${OTHER_FILES}
message($$config_files.files)
INSTALLS+=config_files
# Default rules for deployment.
target.path = $${UBUNTU_CLICK_BINARY_PATH}
INSTALLS+=target
这里我们添加了“core”:
QT += core qml quick
这样可以使得我们可以对QObject类进行编译。同时我们加入“trafficlight.cpp”了:
SOURCES += main.cpp trafficlight.cpp
这样我们可以对这个文件进行编译。同时为了能够在qt creator中显示“trafficlight.h”,我们加入了如下的句子:
HEADERS += trafficlight.h
编译我们的项目,确保我们的代码没有任何的问题。
3)注册我们的C++代码,并使之能够在我们的QML中被利用
打开我们的main.cpp文件,我们修改它为:
#include <QGuiApplication>
#include <QQmlApplicationEngine>
#include <QQuickView>
#include <QQmlContext>
#include <trafficlight.h>
int main(int argc, char *argv[])
{
QGuiApplication app(argc, argv);
qmlRegisterType<TrafficLight>("Light", 1,0, "TrafficLight");
int count = 3;
QQuickView view;
view.setSource(QUrl(QStringLiteral("qrc:///Main.qml")));
view.setResizeMode(QQuickView::SizeRootObjectToView);
view.rootContext()->setContextProperty("total", QVariant::fromValue(count));
view.show();
return app.exec();
}
这里,我们通过:
qmlRegisterType<TrafficLight>("Light", 1,0, "TrafficLight");
来注册我们的TrafficLight,这样它就可以在QML中被利用了。
另外,我们通过如下的方式:
int count = 3;
iew.rootContext()->setContextProperty("total", QVariant::fromValue(count));
来把count传给QML,这样它的值就可以在QML中被引用。
最后,我们来修改我们的main.qml文件:
import QtQuick 2.0
import Ubuntu.Components 1.1
import Light 1.0
/*!
\brief MainView with a Label and Button elements.
*/
MainView {
// objectName for functional testing purposes (autopilot-qt5)
objectName: "mainView"
// Note! applicationName needs to match the "name" field of the click manifest
applicationName: "trafficlight_new.liu-xiao-guo"
/*
This property enables the application to change orientation
when the device is rotated. The default is false.
*/
//automaticOrientation: true
// Removes the old toolbar and enables new features of the new header.
useDeprecatedToolbar: false
width: units.gu(60)
height: units.gu(85)
Page {
title: i18n.tr("trafficlight")
Column {
anchors.centerIn: parent
spacing: units.gu(3)
Repeater {
model: total
delegate:
TrafficLight {
anchors.centerIn: parent.Center
width: units.gu(20)
height: width
color: "red"
}
}
}
}
}
在这个文件中,我们直接导入我们的TrafficLight:
import Light 1.0
这样,TrafficLight就可以直接被使用:
TrafficLight {
anchors.centerIn: parent.Center
width: units.gu(20)
height: width
color: "red"
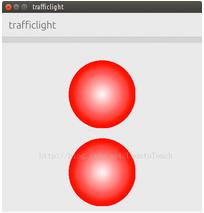
运行我们的应用:

所有的源码在:git clone https://gitcafe.com/ubuntu/trafficlight_new.git
利用qmake来为15.04及以上target创建Ubuntu应用项目:http://www.linuxdiyf.com/linux/11973.html
Fedora安装Qt4后qmake自动连接至Qt3的解决办法:http://www.linuxdiyf.com/linux/10976.html

