Haproxy提供高可用性、负载均衡和基于TCP和HTTP应用的反向代理,特别适用于那些负载特大的web站点,这些站点通常又需要会话保持或七层处理。Haproxy运行在当前的硬件上,完全可以支持数以万计的并发连接,并且它的运行模式使得它可以很简单安全的整合到架构中, 同时可以保护你的web服务器不被暴露到网络上。
环境规划:
tong1: 192.168.1.247 haproxy
tong2: 192.168.1.248 web1
tong3: 192.168.1.249 web2
1.网络配置
tong1节点:
[root@tong1 ~]# hostname
tong1
[root@tong1 ~]# ifconfig | grep Mask
inet addr:192.168.1.247 Bcast:192.168.1.255 Mask:255.255.255.0
inet addr:127.0.0.1 Mask:255.0.0.0
[root@tong1 ~]# vim /etc/hosts
192.168.1.247 tong1
192.168.1.248 tong2
192.168.1.249 tong3
[root@tong1 ~]#
tong2节点和tong3节点一样配置
2.在tong1节点安装haproxy软件,开启haproxy日志功能
[root@tong1 ~]# yum install haproxy -y
[root@tong1 ~]# vim /etc/sysconfig/rsyslog --添加-r参数记录haproxy日志
SYSLOGD_OPTIONS=" -r -c 2"
[root@tong1 ~]# vim /etc/rsyslog.conf --定义日志存放的路径
local2.* /var/log/haproxy.log
[root@tong1 ~]# /etc/init.d/rsyslog restart
Shutting down system logger: [ OK ]
Starting system logger: [ OK ]
[root@tong1 ~]#
[root@tong1 ~]# cd /etc/haproxy/
[root@tong1 haproxy]# vim haproxy.cfg
global
log 127.0.0.1 local2 --开启日志功能
chroot /var/lib/haproxy --运行的路径
pidfile /var/run/haproxy.pid --pid文件存放处
maxconn 4000 --最大连接数
user haproxy --所属运行的用户
group haproxy --所属运行的用户组
daemon --后台运行服务
defaults
mode http --处理的模式(http是七层,tcp是四层)
log global --启用全局日志记录
option httplog --日志类别http格式
option dontlognull --不记录健康检查日志
option http-server-close
option forwardfor except 127.0.0.0/8
option redispatch --serverId对应的服务器挂掉后强制定向到其它服务器
retries 3 --3次连接失败就定义服务器不可用
timeout http-request 10s
timeout queue 1m
timeout connect 10s --服务器连接超时
timeout client 1m --客户端连接超时
timeout server 1m --服务端连接超时
timeout http-keep-alive 10s --持久连接
timeout check 10s --心跳检查超时
maxconn 3000
listen admin_status --自定义监听名,任意取
bind 0.0.0.0:80 --绑定端口
mode http --模式
log 127.0.0.1 local3 err --记录错误日志
stats refresh 20s --每隔20s刷新
stats hide-version --隐藏haproxy版本信息
stats uri /haproxy-stats --在域名后面添加/haproxy-stats可以查看haproxy监控状态
stats auth haproxy:system --用户名和密码 stats hide-version
stats admin if TRUE --可以手动启动和停止服务
listen site_status --检查后端主机的健康
bind 0.0.0.0:80
mode http
log 127.0.0.1 local3 err
monitor-uri /site-stats --使用url地址检查
frontend main_status --定义acl规则
bind 0.0.0.0:80 --绑定到80端口
mode http
log global
option httplog
option forwardfor
acl web1 hdr_reg(host) -i ^(www.itnihao.cn|ww1.itnihao.cn)$
--匹配www.itnihao.cn和ww1.itnihao.cn两个域名就放到web1变量中
acl web2 url_sub -i killall= --请求中包含killall= 就放入到web2变量中
acl web3 path_beg -i /static /images /javascript /stylesheets
use_backend server_web3 if web3 --满足web3变量的就丢到server_web3里面的虚拟主机
default_backend server_web4 --都不满足就丢到server_web4里面的虚拟主机
backend server_web3
mode http
balance roundrobin
option httpchk GET /test.html --定义首页 址
server ton1 192.168.1.248:80 check inter 1500 rise 3 fall 3 weight 1
--后端服务器,inter 1500是检查心跳频率,rise 3是3次正确可用,fall 3是3次失败不可用,weight 1是权重
server ton2 192.168.1.249:80 check inter 1500 rise 3 fall 3 weight 1
backend server_web4
mode http
balance roundrobin
option httpchk GET /index.html
server ton3 192.168.1.248:80 check inter 1500 rise 3 fall 3 weight 1
server ton4 192.168.1.249:80 check inter 1500 rise 3 fall 3 weight 1
[root@tong1 haproxy]# /etc/init.d/haproxy restart
Stopping haproxy: [ OK ]
Starting haproxy: [ OK ]
[root@tong1 haproxy]#
3.在后端主机安装apache服务
tong2节点:
[root@tong2 ~]# hostname
tong2
[root@tong2 ~]# yum install httpd -y
[root@tong2 ~]# vim /etc/httpd/conf/httpd.conf
ServerName 127.0.0.1
[root@tong2 ~]# echo 'node2' > /var/www/html/index.html
[root@tong2 ~]# echo 'static node2' > /var/www/html/test.html
[root@tong2 ~]# /etc/init.d/httpd restart
Stopping httpd: [ OK ]
Starting httpd: [ OK ]
[root@tong2 ~]#
tong3节点:
[root@tong3 ~]# hostname
tong3
[root@tong3 ~]# yum install httpd -y
[root@tong3 ~]# vim /etc/httpd/conf/httpd.conf
ServerName 127.0.0.1
[root@tong3 ~]# echo 'node3' > /var/www/html/index.html
[root@tong3 ~]# echo 'static node3' > /var/www/html/test.html
[root@tong3 ~]# /etc/init.d/httpd restart
Stopping httpd: [ OK ]
Starting httpd: [ OK ]
[root@tong3 ~]#
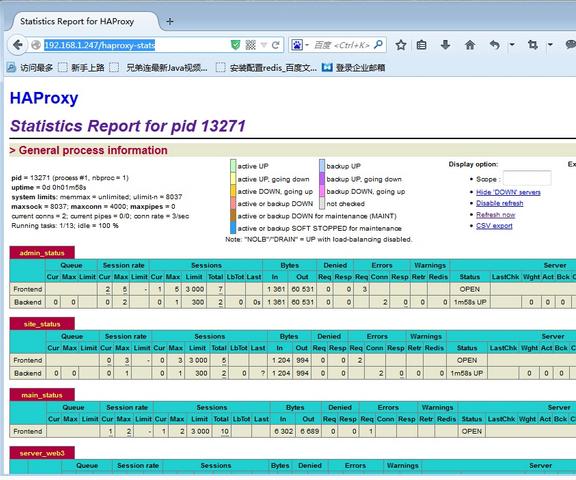
4.检查haproxy的状态和监控

后端主机的监控页面
(1)后端主机状态正常

(2)后端主机不正常,出现宕机

正常访问节点


注:以上图片上传到红联Linux系统教程频道中。


